Monday, April 20, 2015

Creepy Carrot Craft

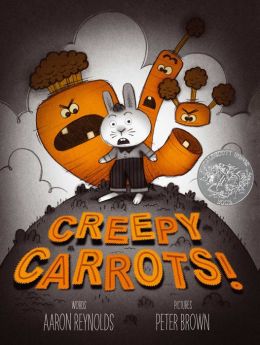
Phew!  Seems like I haven't had time to sit down and post some of my newest crafts in a long time.  I came up with this one last week for a Preschool-2nd grade storytime.  I am showing the movie Creepy Carrots! based on the book by Aaron Reynolds.
I will also be reading:
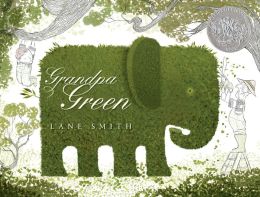
Grandpa Green by Lane Smith
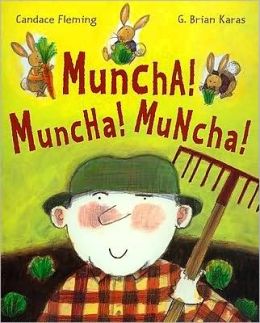
Muncha! Muncha! Muncha! by Candice Fleming


Here is the craft I came up with:
What you will need:
  • Orange foam
  • Green yarn
  • Tapestry needle (or glue the yarn on)
  • Brown construction paper
  • Gray strips of construction paper
  • Kidney beans
  • Googly eyes
  • Markers

Cut carrot shapes out of the foam.  Mine are about 3-4" long.  I used green yarn and a tapestry needle to make the greens of the carrot.  It took a little time, but I really like how it looks, and I am doing this craft with a small group of kids.  
I cut sheets of brown construction paper in half and then folding each piece in half (hamburger fold) leaving about 1/4" tab on the back half.  This is how the carrots will be slipped into the dirt.  Glue the sides leaving the top open.  I added a gray trim to make it look like a garden.  The kids will glue kidney beans around the gray edges to make stones.  
Have the kids add some eyes and squiggly mouths to make their carrots creepy.
Enjoy!

Tuesday, January 13, 2015

Puzzle Piece Snowflake

Here is the craft I made last night with my evening storytime kids.  They LOVED it.  Especially when I mentioned we would be adding some glitter to our projects.  Glitter just makes everything better.

What you need:
  • Cardstock
  • Snowflake template (I found one online)
  • Blue and white puzzle pieces (or you can have the kids paint them)
  • Liquid glue
  • Glitter
  • Hole punch
  • Fishing line


I cut out all the snowflakes ahead of time and double layered the cardstock to make it sturdy.  If I had thicker cardstock on hand, I would have just used that instead.   Punch a hole in the snowflake and tie some fishing line onto it.  To keep things a little on the cleaner side, I put swirls of glue on the snowflake for the kids to cover with puzzle pieces and added the swirls of glue on top of the puzzle pieces for the glitter.  This kept the mess to a minimum.
The kids had a blast making this craft and were very exited to learn that they did not have to put all the puzzle pieces together!
Enjoy!

Friday, December 5, 2014

Polar Bear Snow Globe


Here is a sneak peak at one of my crafts for Winter Evening Storytime.  I wanted to do a polar bear theme again, but wanted to switch up the craft.  The globe and stand are made out of cardstock.  The bear and die-cut tree are made out of regular paper.  Add some white pom poms and you have yourself an adorable snow globe.

Monday, September 15, 2014

Paper plate owl

This little guy came out way better than I expected.  I will be using this craft for a Fall craft day later this month.  

What you need:
  • Paper plates
  • Markers
  • Construction paper
  • Glue
  • Scissors


Color the center of the paper plate.  I made a simple squiggle pattern alternating with fall colors to make it look like feathers.  Fold the sides of the plate toward the center to make the wings.  Fold the top half of the plate down about an inch and a half.  Glue in place.  
While that has time to dry cut out two large circles and two small circles for the eyes.  I decided to use yellow and black for the eyes.  Cut out a small triangle and feet out of orange construction paper.  Set these aside and color the wings.  I decided to follow the stripes on the paper plate, you can make any design you like.  Glue the eyes, beak, and feet in place.  There you have it, a cute little owl.
Enjoy!

Friday, September 12, 2014

Sparkly Apple Magnet

Here is a quick and fun craft for kids.  I had all the supplies on hand!

What  you need:
  • Red foam: I used a die cut machine to cut mine into an apple shape
  • Green pipe cleaner
  • Green glitter
  • Gold glitter
  • Wiggly eyes
  • Magnetic strip
  • Glue
  • Scissors


Use liquid glue to add gold glitter to the stem of the apple and green glitter to the leaf.  Cut a pipe cleaner in half.  Fold one piece of the pipe cleaner in half to make the head of the worm.  Use the pipe cleaner to carefully poke a hole through the foam.  Slide the piper cleaner through the hole so there is enough hanging out of the back side of the apple to twist in place.  Try to keep the back twist as flat as possible.  Cut any extra pipe cleaner off.  Add a wiggly eye to the worm and a magnetic strip to the back.  That's it.

Enjoy!

Thursday, September 11, 2014

Apples and Pumpkins

These are two Pinterest inspired crafts that I will be using in programming this Fall.  Since we have the Apple Fest in out town I try to make an apple craft in the fall.  It was time to change it up this year.  I decided on this adorable apple core craft that I changed up just a bit and this paper pumpkin.  Both are pretty easy to assemble and make great decorations for the home--especially the pumpkin!


Apple Core: Inspired by this pin.
What you need:
  • Toilet paper tubes
  • White paint
  • Paint brushes
  • Black seeds ( I made mine on the computer)
  • Red construction paper Cut into about 5 inch squares
  • Green construction paper
  • Scissors
  • Glue (I used glue sticks and everything is holding up just fine)
I painted all the tubes white before hand so that the kids can get to work assembling their apples.  Have the kids cut a two squiggly circles out of two red squares to glue on the top and bottom of the white tube.  Next, have the kids cut a leaf shape out of green paper and glue to the top red piece.  Or you can make a stencil for them to trace.  Using glue, adhere four seeds to one side of the apple core.  Spin the the apple core to the other side and glue four more seeds to the core.  And that's it!  If you want to add a small worm to the top for fun go for it.  :-) 


Paper Pumpkin: Inspired by this pin. This pin has great step-by-step photos.
What you need:
  • Green pipe cleaner
  • Orange cardstock
  • Hole punch
  • Scissors or paper cutter
First thing you need to do is cut your orange cardstock into long strips.  I did not measure mine so they are not perfect.  For a larger pumpkin-like mine-cut the paper length wise.  For a smaller pumpkin cut the strips on the short side of the paper.  I used two whole sheets of paper for my pumpkin.  If you want this craft to be quicker for a program, cut the paper into strips ahead of time.  Next, use the hole punch on both ends of each strip.  Stack your strips one on top of the other.  String the green pipe cleaner through one end of the strips.  Bend a little of the pipe cleaner to keep the paper from falling off.  String the pipe cleaner through the top of the other end of the papers.  Pinch the pipe cleaner at the top to make a little stem to hold the paper in snug.  Curl the remaining pipe cleaner to look like a little piece of vine.  Now, fan the papers out to make a round pumpkin.  Stand back and admire your creation.


Enjoy!

Tuesday, September 9, 2014

New posts are coming!

Just a quick update.  I have a TON of new craft and storytime posts coming up.  I'm still recovering from the Summer Reading Program.  It was a great summer and I have so many ideas to share with you.  Check back soon for some  great projects.

Amy